Exercises (MGDP2050)
This article lists exercises for Web Design and Development II (MGDP2050).
Contents
- 1 Exercises
- 2 Exercises: in class
- 3 Exercises: for next class session
- 4 Exercises: in class
- 5 Exercises: for next week
- 6 Exercises: for next week
- 7 Exercises: in-class
- 7.1 Goal: demonstrate jQuery UI components
- 7.2 Browse the jQuery UI demos
- 7.3 Download and install jQuery UI
- 7.4 Instructor's example: files
- 7.5 Instructor's example: jQuery UI Components
- 7.6 Instructor's example: Dialog component
- 7.7 Instructor's example: CSS
- 7.8 Instructor's example: HTML for link
- 7.9 Instructor's example: HTML for Dialog
- 7.10 Instructor's example: JavaScript
- 7.11 Instructor's example: Dialog component screenshot
- 7.12 Instructor's example: Dialog component text
- 7.13 Create folder named week8
- 7.14 Create web page
- 7.15 Demonstrate a jQuery UI component
- 7.16 Update your home page
- 7.17 Upload to web server
- 8 Exercises: for next week
- 9 Exercises: by next week
- 10 Exercises: in class
- 10.1 Goal
- 10.2 Create week10 folder and web pages
- 10.3 Add content for Backbone.js
- 10.4 Save local copies of Underscore.js and Backbone.js
- 10.5 Add script elements for Underscore.js and Backbone.js
- 10.6 Create a custom JavaScript file
- 10.7 Add script element for custom JavaScript file
- 10.8 Create a JSON file, and change the data
- 10.9 Upload work to server, and test
- 10.10 Make link from Home page to exercise page
- 11 For next week
- 12 Exercises: in class
- 13 Exercises: for next week
- 14 Study these examples for next week
- 15 See also
Exercises
Week One
Create a local root folder -- a folder for your class work.
- Store your work on a jump drive, external drive, laptop computer, etc.
Download Bootstrap. Put your downloaded Bootstrap folder in your Local Root Folder.
Create a text file named index.html. This will be the home page for your classroom work.
Copy the Bootstrap template code and paste it into index.html.
Set the page title appropriately.
Fixing the CSS paths.
Override CSS styles: use an external style sheet to override one or more of the default Bootstrap styles.
Browse your index.html page. Confirm that your CSS changes are visible.
Week Two
Create folder named rwd, and create new web page named index.html.
These steps are standard procedure for many exercises.
Make this page similar to your Home page (same CSS, similar layout)
Browse the World Wide Web for responsive websites.
In your new web page, do this for each of the three responsive websites you selected:
- State the name of the website
- Provide a link to the website
- Write a short statement (one paragraph, maybe two) about why you selected the website as an example.
Project:
- In your Local root folder, create a new folder named
project - In this new folder, create a file named
index.html - Make this page similar to your Home page (same CSS, similar layout)
- Set the page title appropriately, and enter standard exercise content (see ...)
Do you have an idea for a project?
- If so, describe the idea (one or two paragraphs)
- If not, describe three potential ideas (one or two sentences each)
Sketches for wireframe:
Make three simple pen-and-paper sketches for your project, for three device sizes:
- Mobile phone
- Tablet
- Desktop
Simplify everything: emphasize functionality, minimize design.
Design considerations include:
- What will the user see first?
- How will the user navigate?
These sketches form a simple website wireframe -- a tool to help you plan your project.
Week Three
Study groups
Organize yourself into groups of three or four.
Discuss your project idea(s) and website wireframe sketches.
Think about web usability, UX, and other group-related activities.
Ask yourself:
- How can I use the power of a study group to improve my project?
- How I can be helpful to other students as part of a study group?
Before you leave:
- Write down the names of your group members
- Turn in list of names to instructor
Project
Decide what you want to do for your project, if you have not already done so.
Improve wireframes
Improve your wireframes.
You should have three wireframes, for three device sizes:
- Phone
- Tablet
- Desktop
Wireframe images
For each wireframe, make an image for the web.
- JPG or PNG, your choice
These are images you might show to a client, early in the web design process.
- Should look better than a back-of envelope scribble
- Does not need to be final, professional-grade presentation
Create folder (wireframe)
In your Local root folder, create a new folder named wireframe.
Create web page
In your wireframe folder, create a file named index.html.
Make this an HTML 5 web page, similar to your home page.
Set the page title and other standard information accordingly.
Display your wireframe images on the page.
Add text in the web page as appropriate -- state the device display size for each image, and anything else you care to say about the wireframes.
Update your Home page
On your Home page, make a link to your new Wireframe page.
Week Four
FTP
Use an FTP client of your choice to upload your class files to the class web server.
Be sure you upload your work to the correct remote sub-folder!
View your work in a browser of your choice.
- Test the links, make sure everything works correctly
- Make sure all of your pages have appropriates titles
- Make sure your styles are consistent across pages
Finish (or improve) previous exercises
Finish any unfinished exercises from previous weeks, and improve anything you thing needs improvement.
Bootstrap
Revise your wireframe page: use Bootstrap responsive images.
Be sure to use appropriate alt attributes for each image.
Upload to server
Finish any unfinished exercises from previous weeks, and improve anything you thing needs improvement.
Browse online, test your work
Browse your work on the class web server.
Use two (or more different) devices to browse your work:
- Phone
- Tablet
- Laptop/desktop
Make sure your content is readable. Change your custom CSS rules as necessary.
Make sure all links work.
Week Five
Exercises: in class
No in-class exercises.
Open lab after lecture.
Exercises: for next class session
Create folders
In your local root folder, create new folders named:
- bootstrap-2-column (Two-column bootstrap exercise)
- bootstrap-3-column (Thtree-column bootstrap exercise)
- bootstrap-nested-column (Nested column bootstrap exercise)
- bootstrap-custom-template (Custom template exercise)
Create web pages
For each new folder, create a web page named index.html.
- Each page must use your standard Bootstrap exercise styles and layout
- Also set page titles accordingly
- Give each page enough content to fill up the page
- Both text and responsive images
- May be actual content, or lorem ipsum
Two-column Bootstrap
Make this page display a two-column Bootstrap layout.
Three-column Bootstrap
Make this page display a Three-column Bootstrap layout.
Nested Bootstrap
Make this page display a nested Bootstrap layout.
Bootstrap custom template
Browse the Bootstrap example templates:
Pick one of the examples:
- Your choice
- Something related to your project might be useful
- Be ambitious
Implement the example in your Custom Bootstrap Template page.
You will need to change the paths to external style sheets and external JavaScript files.
You may need to download additional files, and upload them to your own website.
- You can do this using View Source, and following the link to the file you need
Finishing up
Make a link from your Home Page to each of the individual exercise pages.
Upload all work to server.
- Instructor will review next class session.
Week Six
Exercises: in class
This exercise is similar to:
In your Local root folder, create a new folder named week6.
In this folder, create a new document named index.html.
- Make this similar to you home page and other exercise pages
Use the Bootstrap grid to create a page layout something like the screenshot below.
Exercises: for next week
Update your home page, and all your exercise pages, to use a Bootstrap navigation bar.
Project
In your local root folder, change the name of folder project to project-plan.
- Update your home page accordingly (so the link points to the renamed folder).
Create a new folder named project. This is where your actual project will go.
In your project folder, create a document named index.html. This is the home page for your project
- Use Bootstrap with this page.
- Do not use the custom CSS that you developed for your home page and other exercises
- Instead, create an external CSS file specifically for your project
Week Seven
Catch up on any unfinished exercises from previous weeks.
Make sure all your exercises are uploaded to your class web server account.
Exercises: for next week
Create folder for scripts
Create a new folder named scripts in your local root folder.
Save the jQuery file in this folder.
Use this jQuery file for tonight's exercises, and any later exercises that use jQuery.
Demonstrate jQuery
Create a new folder named jquery in your local root folder.
In this folder, create a web page named index.html.
- Same standard style as your home page and other exercise page
Demonstrate jQuery
Create a new folder named jquery in your local root folder.
In this folder, create a web page named index.html.
- Same standard style as your home page and other exercise page
Demonstrate jQuery, similar to the classroom example:
(Demonstrate how jQuery changes HTML -- please do not use alert() messages.)
Do not just copy-and paste:
- You may start with copy-and-paste
- But then do something creative
Demonstrate Bootstrap modal
Create a new folder named bootstrap-modal in your local root folder.
In this folder, create a web page named index.html.
- Same standard style as your home page and other exercise page
Demonstrate a Bootstrap modal, similar to the classroom example:
Week Eight
Exercises: in-class
Goal: demonstrate jQuery UI components
First goal, create folder named week8 and demonstrate the jQuery UI component, something like this:
Click the "Open dialog" button to confirm that the dialog box works.
Note that some text is too small. Also, the dialog box has different colors from the rest of the page. How do we fix this?
I created the example in the usual way:
- Create a week8 folder
- Copy the index.html page from a previous exercise
- Paste into the week8 folder
- Update the page title, and change the contents to this week's exercise
Then I copied sections of jQuery UI example page (which is part of the jQuery UI download), and pasted those sections into my exercise page.
Here is the jQuery UI example page:
Find the example page in your own jQuery UI folder, open it in a text editor, and copy-and-paste the sections you need.
The remainder of this page discusses the process in more detail.
Final goal, demonstrate three different jQuery UI components.
Browse the jQuery UI demos
Browse the jQuery UI demos.
Try several.
Pick three which interest you.
Download and install jQuery UI
Browse the jQuery UI website:
Click the "Stable" link (in the Quick Downloads section).
- This will download a Zip file containing the jQuery UI files.
Unzip the Zip file, if necessary, to get the jQuery UI folder.
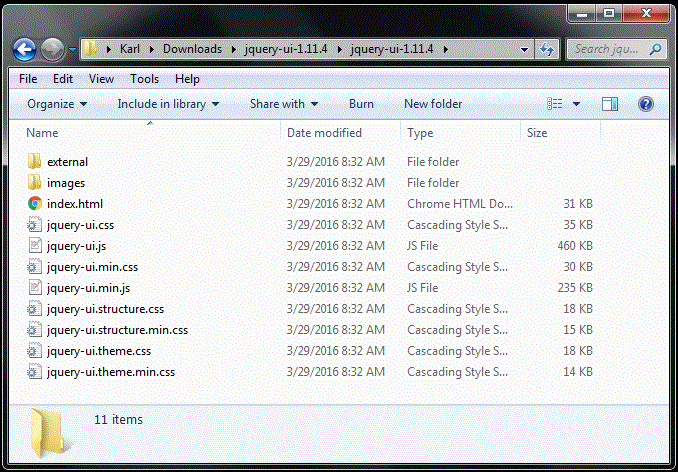
There is a first folder named jquery-ui-1.11.4 (or something similar -- version number may increase).
This folder contains a second folder with the same name, containing the jQuery UI files and subfolders. This is the actual jQuery UI folder.
Instructor's example: files
Move the jQuery UI folder to your local root folder.
You can now use jQuery UI in your web pages.
Instructor's example: jQuery UI Components
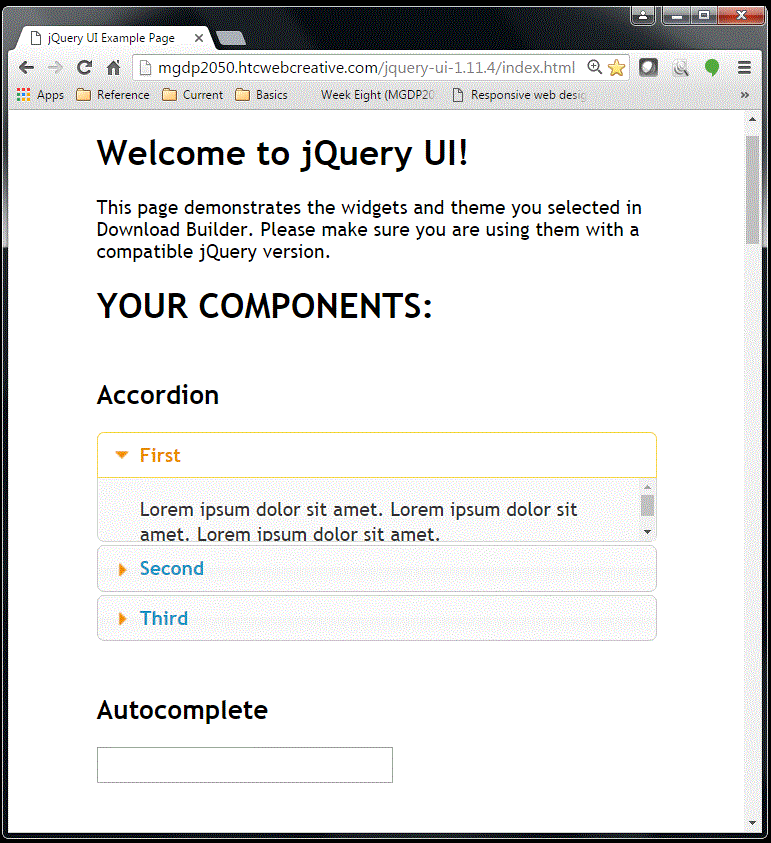
The jQuery UI folder contains a web page named index.html which demonstrates the components.
Link to the instructor's page:
The screeshot below shows the Components page in a web browser:
Instructor's example: Dialog component
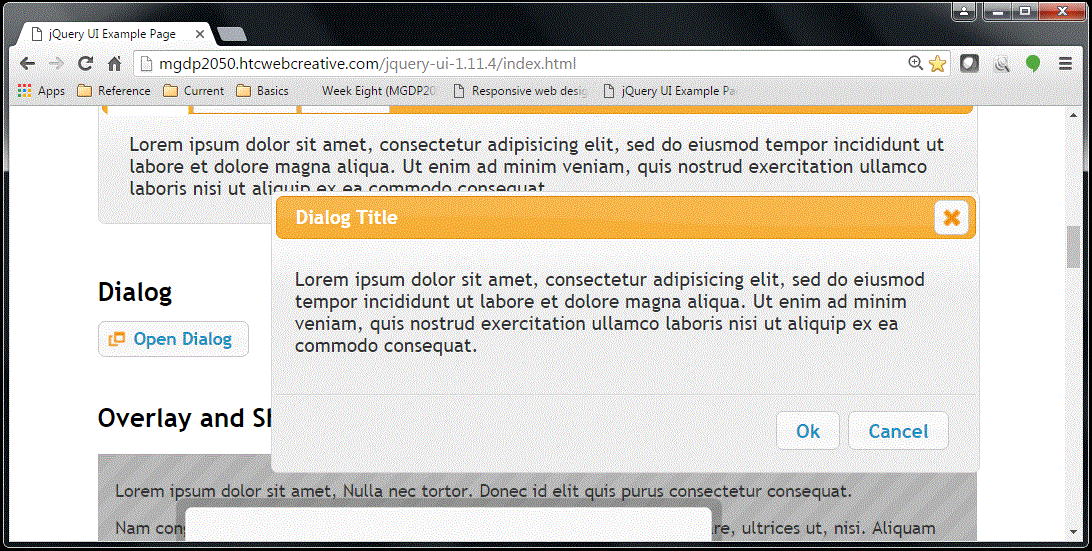
The screenshot below show the Components page, scrolled down the Dialog button
The button has already been clicked to reveal the Dialog box.
Based on this demo:
Instructor's example: CSS
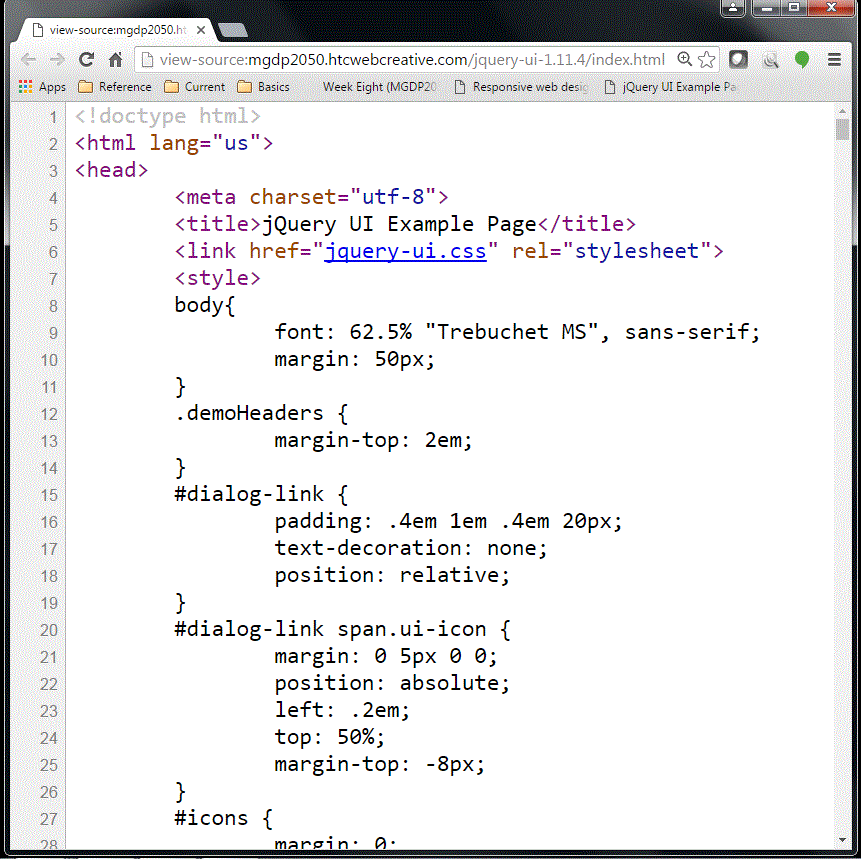
Screenshot of source code -- note the external CSS file, and the internal CSS styles:
Instructor's example: HTML for link
The screenshot below shows the HTML for the link that launches the Dialog component:
Instructor's example: HTML for Dialog
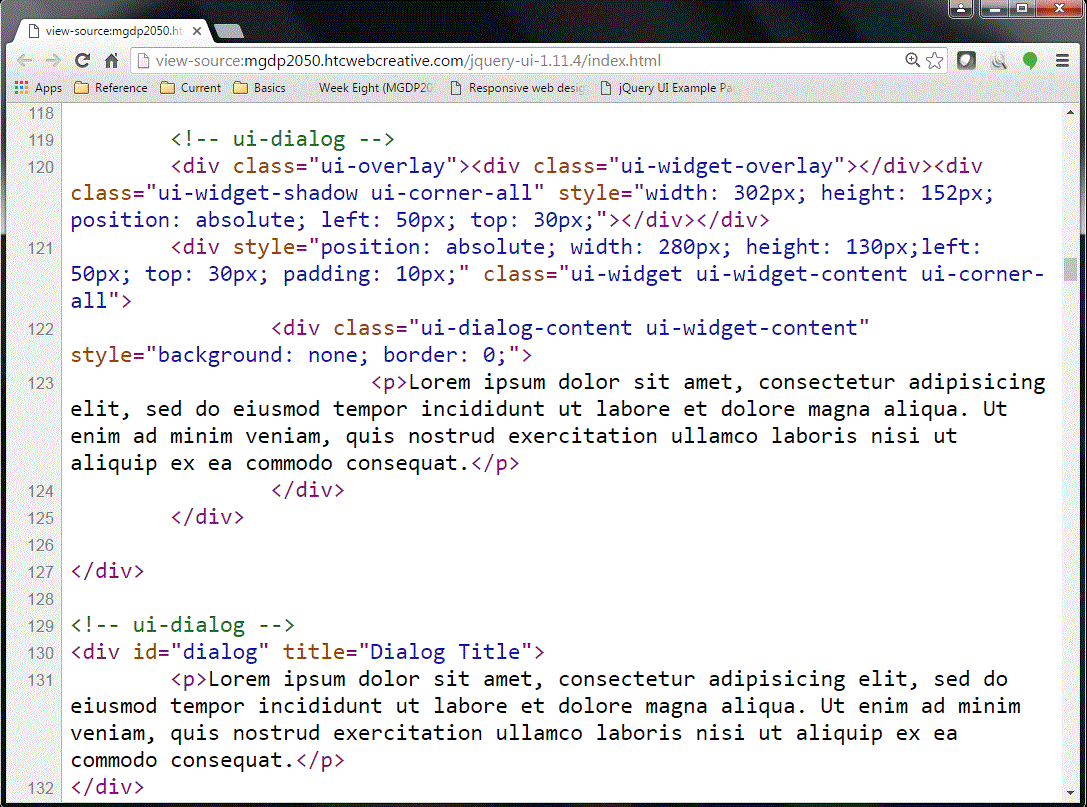
The screenshot below shows the HTML for the Dialog itself:
Instructor's example: JavaScript
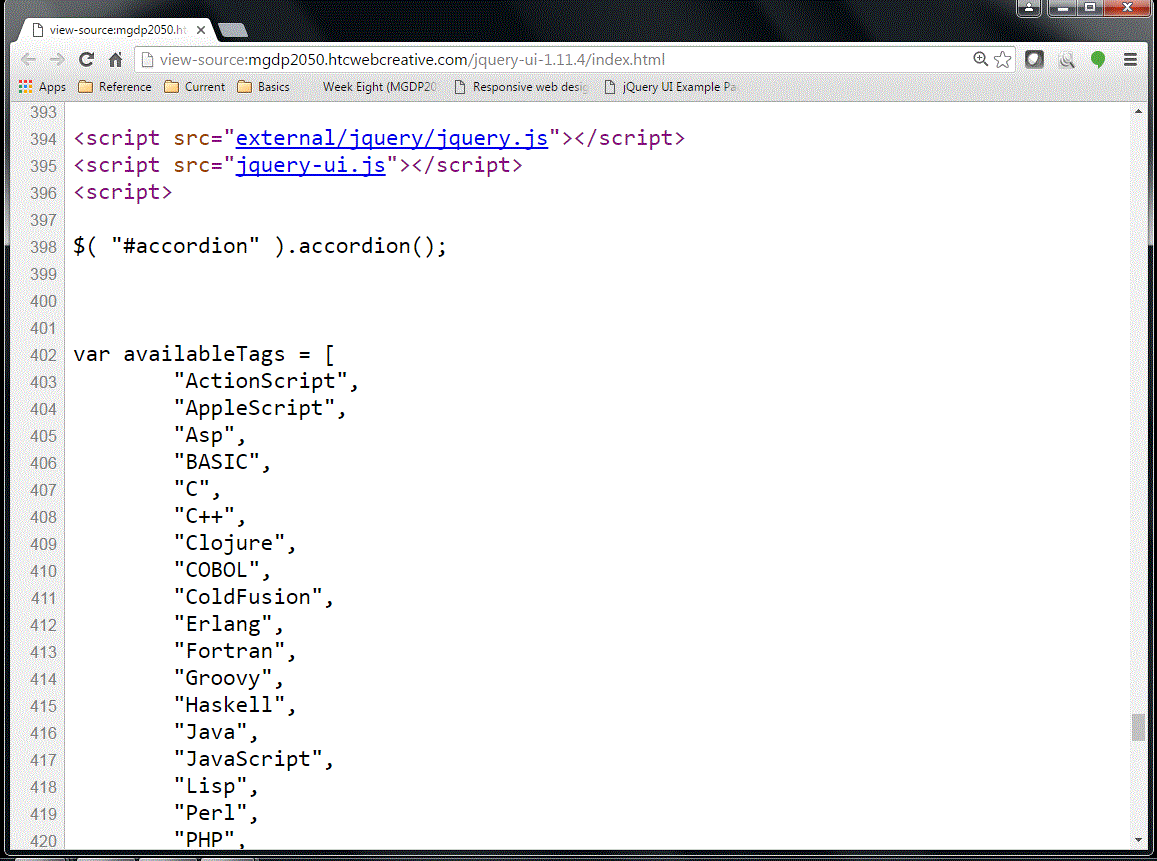
The screenshot below shows some of the JavaScript for the instructor's Sample components page.
Note the external JavaScript files, and some internal JavaScript (only first portion shown here).
Instructor's example: Dialog component screenshot
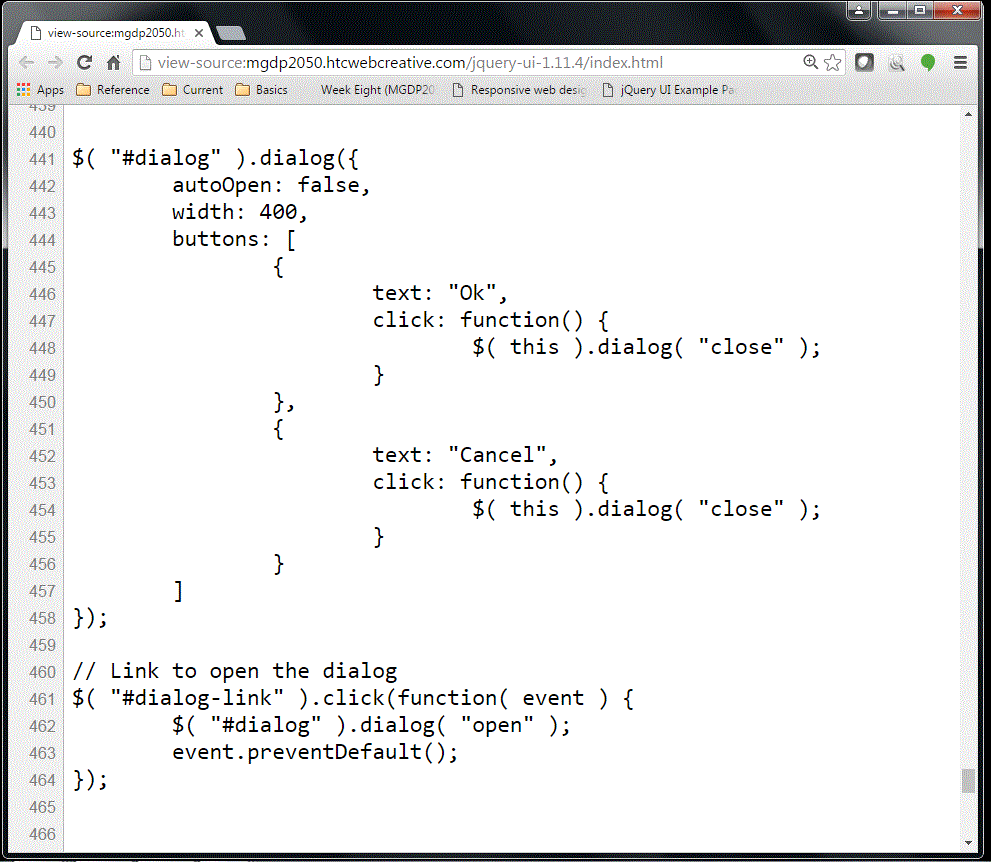
The screenshot below shows the internal JavaScript for the Dialog component example:
Instructor's example: Dialog component text
Here is the JavaScript for the Dialog box:
$( "#dialog" ).dialog({
	autoOpen: false,
	width: 400,
	buttons: [
		{
			text: "Ok",
			click: function() {
				$( this ).dialog( "close" );
			}
		},
		{
			text: "Cancel",
			click: function() {
				$( this ).dialog( "close" );
			}
		}
	]
});

// Link to open the dialog
$( "#dialog-link" ).click(function( event ) {
	$( "#dialog" ).dialog( "open" );
	event.preventDefault();
});
Create folder named week8
In your local root folder, create a new folder named week8.
Create web page
In your week8 folder, create a web page named index.html.
- Similar to other exercise pages.
- Set page title, etc.
Demonstrate a jQuery UI component
In your web page, demonstrate a jQuery UI component of your choice.
Update your home page
On your Home page, make a link to your jQuery UI exercise.
Upload to web server
Upload your work to the web server:
- Exercise page
- jQuery UI folder
Exercises: for next week
Demonstrate two more jQuery UI components
Demonstrate two more jQuery UI components of your choice.
You may do this in the same web page, or you may create additional web pages.
- If you create additional web pages, provide links on your home page.
Week Nine
Exercises: by next week
Goal: demonstrate Backbone.js
Demonstrate a simple Backbone.js application.
Study this example:
Compare the instructor's example:
Create week9 folder and web page
In your local root folder, create a new folder named week9.
Inside your week9 folder, create a web page named index.html.
- Use your standard Bootstrap exercise layout and CSS
- Set the page title appropriately
underscore.js
Underscore.js is a JavaScript library. This library is required by Backbone.
Add a script element to your web page, like this:
<script src="http://cdnjs.cloudflare.com/ajax/libs/underscore.js/1.1.7/underscore-min.js"></script>
backbone.js
Backbone.js is a JavaScript library.
Add a script element to your web page, like this:
<script src="http://cdnjs.cloudflare.com/ajax/libs/backbone.js/0.5.3/backbone-min.js"></script>
HTML for the exercise
Add this HTML to your page:
<script id="new_person_template" type="text/template">
 <label>
  Name:
  <input id="txtName" type="text" title="Type your name please" />
 </label>
 <button id="btnSubmit" type="button" value="Submit">Submit</button>
</script>

<script id="person_template" type="text/template">
 Hello, my name is <%= name %>
</script>


<div id="container">	<!-- the #container element where Backbone renders its view -->

</div>
Note that the script elements in the above HTML do not behave like standard scripts.
Instead, these script elements are use by Backbone.js to generate content.
Custom external JavaScript file
Add an external JavaScript file of your own, for your custom JavaScript. Like this:
<script src="backbone-exercise-1.js"></script>
For convenience, create your custom JavaScript file in the same folder as your exercise.
You could put your custom JavaScript file in your scripts (where your jQuery file is located).
However, the scripts folder is best used for external JavaScript files which will be shared by two or more web pages.
Since the external JavaScript for this exercise will not be shared by other web pages, it's fine to store the JavaScript file in the exercise folder.
Custom JavaScript file
Here is the JavaScript that goes in your custom JavaScript file:
// JavaScript for Backbone Exercise #1

window.app = {};

window.app.Person = Backbone.Model.extend({
    defaults: { name: "Type your name" },
    validate: function () { }
});

window.app.People = Backbone.Collection.extend({
    model: window.app.Person
});

window.app.NewPersonView = Backbone.View.extend({
    template: _.template($("#new_person_template").html()),
    initialize: function () {
        _.bindAll(this, 'submit');
    },
    events:
    {
        "click #btnSubmit": "submit"
    },
    render: function () {
        $(this.el).html(this.template());
        return this;
    },
    submit: function (x, y, z) {
        var person = new window.app.Person({name: $("#txtName").val()});
        this.model.add(person);
    }
});

window.app.PersonView = Backbone.View.extend({
    tagname: "li",
    template: _.template($("#person_template").html()),
    render: function() {
        $(this.el).html(this.template(this.model.toJSON()));
        return this;
    }
});

window.app.PeopleView = Backbone.View.extend({
    tagName: "ul",

    initialize: function() {
        _.bindAll(this, "render", "renderPerson");
        this.model.bind("add", this.renderPerson);
    },

    render: function() {
       console.log("rendering");
       this.model.each(this.renderPerson);
       return this;
    },

    renderPerson: function(person) {
        var personView = new window.app.PersonView({model: person});
        $(this.el).append(personView.render().el);
    }
});


$(document).ready(function () {

    var people = new window.app.People();
    var newPersonView = new window.app.NewPersonView({model: people});
    var peopleView = new window.app.PeopleView({model: people});

    $("#container").html(newPersonView.render().el);
    $("#container").append(peopleView.render().el);
});
Update your home page
On your Home page, make a link to this exercise.
Upload to web server
Upload your work to the classroom web server.
Week Ten
Exercises: in class
Goal
Create a web page which demonstrates Backbone.js and Ajax.
Similar to this example page.
Create week10 folder and web pages
Create a new folder named week10, and a new web page named index.html, with the usual exercise styles, title, etc.
Add content for Backbone.js
Add web page content for Backbone.js to your exercise page.
You can use View Source and copy the code from the example page, or copy the code below:
<script type="text/template" id="itemlist_template">
 <li><%= item_name %></li>
</script>

<ol id="items">
</ol>
Two things to note about the above code example:
- The script element plays a special role here, as an Underscore template.
- The ol element is where the Backbone will render (display) content.
In both cases, the id attribute is essential. (Why?)
Save local copies of Underscore.js and Backbone.js
Save local copies of the Underscore.js and Backbone.js files in your scripts folder.
Upload them to your class web server -- you will need them online, later in the exercise.
Easy way
Browse the Content Delivery Network, and save the files to your scripts folder:
- http://cdnjs.cloudflare.com/ajax/libs/underscore.js/1.1.7/underscore-min.js
- http://cdnjs.cloudflare.com/ajax/libs/backbone.js/0.5.3/backbone-min.js
More technical way
Browse the web sites, and download from there, etc.:
Add script elements for Underscore.js and Backbone.js
You can use View Source and copy the code from the example page, or copy the code below:
<!--- Underscore.js --->
<script src="../scripts/underscore-min.js"></script>

<!--- Backbone.js --->
<script src="../scripts/backbone-min.js"></script>
Create a custom JavaScript file
Create a file named week10.js in your exercise folder.
Add JavaScript to custom JavaScript file
You can use View Source and copy the code from the example page, or copy the code below:
// JavaScript for Backbone and Ajax example

$(function(){

	var Item = Backbone.Model.extend();

	var ItemList = Backbone.Collection.extend({
  model: Item,
  url: '/week10/data.json'
});

var ItemsView = Backbone.View.extend({
  template: _.template($('#itemlist_template').html()),
  render: function(eventName) {
    _.each(this.model.models, function(item){
      var lItemName = item.attributes['item_name'];
      var lTemplate = this.template(item.toJSON());

      $(this.el).append(lTemplate);
    }, this);
    return this;
  }
});

var lItems = new ItemList;


var AppView = Backbone.View.extend({
  el: "body",

  render: function(){
    var lItemsView = new ItemsView({model:lItems});
    var lHtml = lItemsView.render().el;
    $('#items').html(lHtml);
  },

  initialize: function(){
    var lOptions = {};
    lOptions.success = this.render;
    lItems.fetch(lOptions);
  }
});

  var App = new AppView;
});
Note: do not modify any of the above code. Use it as-is.
- Extra credit: do modify the above code.
- This is a substantial challenge for aspiring JavaScript programmers only.
Add script element for custom JavaScript file
In your exercise page, add a script element for your custom JavaScript.
You can use View Source and copy the code from the example page, or copy the code below:
<!--- Custom script for this exercise --->
<script src="week10.js"></script>
Note that the src attribute points to your custom external JavaScript file.
Create a JSON file, and change the data
Create a JSON file named data.json, similar to this example:
Save the JSON file in your week10 folder.
Change the item names ("Solid Gold Submarine", etc.) to names of your choice, related to your project topic.
Upload work to server, and test
Note that you must test this exercise online -- it will not work locally. The JSON data must be served by a web server.
Make link from Home page to exercise page
Make link from your Home page to your exercise page.
Upload your Home page, and test the link to your exercise.
For next week
Work on your project.
Questions to ask yourself
- What are my goals?
- Have I defined my project to my satisfaction?
- Do I know what I really want to accomplish?
- Do I have a wireframe? Does it reflect my goals?
- Does the wireframe show three layouts, for three device sizes?
- About the device sizes ...
- Do I know how to make columns and rows in Bootstrap?
- Do I want to hide some information in smaller devices?
- Are my images responsive, and appropriate for different device sizes?
- Does my navigation bar work, and make sense?
- Will users be able to find what they are looking for?
And:
- What questions do I need to answer next? What is the critical path for my project?
- Can I answer them for myself?
- Should I ask the instructor?
Yes, you should feel free to ask the instructor about your project.
I am happy to help you with anything -- answer questions, help you write HTML and CSS, and so on.
Take action
- Write HTML.
- Write CSS.
- Write text copy, or use lorem ipsum, or both.
- Create (or obtain) images.
- Resize images as needed.
- Upload your work to your class web server.
Week Eleven
Exercises: in class
This is an exercise in user research, user experience, and related topics.
User persona forms
Instructor will hand out User persona forms.
Write your name on both forms, to identify yourself. (Don't fill out the informational boxes -- those are for the fictional persona.)
User research
This is a group exercise. Organize yourself into groups of two to several people.
Go around the group, each student acting as "reseacher", the others as "subject(s)".
Researcher:
- Briefly explain your project website to the subject(s).
- Describe the typical visitor, or visitors -- the actors, in user experience terminology.
- Describe what the actors do
- Try to characterize two actors:
- One typical actor, the average visitor
- One less typical actor, or actor different in some way (for example, an administrator who needs to log in)
Subjects:
- Create a two fictional persona, based on the researcher's description of the website
- Fill out a User persona forms -- invent name, background, etc. -- for each persona.
Exercises: for next week
User persona form
Design your own user persona form, similar to the examples from the lecture notes and in-exercise, but customized to meet your needs.
The goal is to design a form that you might actually use someday.
Make it a one-page printable form.
It can be in any format, so long as it is easily printable as a one-page document.
You can make a printable web page -- in this, your Week Eleven web page (see below) is the printable form.
Or you can provide the form in some other format, and link to it from your Week Eleven page.
PDF is a useful format.
Word processor is okay. LibreOffice is ideal. Microsoft Word is acceptable. Text files are acceptable.
Create week11 folder and web pages
Create a new folder named week11, and a new web page named index.html, with the usual exercise styles, title, etc.
Either use this page as the persona form, or include a link to your persona form document.
Home page
On your Home page, include a link to your Week Eleven page.
Upload work to server, and test
Upload all files to your classroom web server.
Test.
Study these examples for next week
- http://code.karljones.com/css/ CSS 3 examples] @ code.karljones.com
Week Twelve
...
Week Thirteen
...
Week Fourteen
...
Week Fifteen
Last class session of the semester.
No exercises.

